Using ESP32 Boards for Low-Cost Bitcoin Payment Terminals
Using ESP32 Boards for Low-Cost Bitcoin Payment Terminals
Bitcoin adoption continues to grow globally, particularly in small businesses and emerging markets where accessibility and cost-efficiency are critical. The ESP32, a low-cost and versatile microcontroller, offers an ideal solution for entrepreneurs and developers seeking to build Bitcoin payment terminals. Let’s explore how ESP32 boards can transform Bitcoin payments by being affordable, adaptable, and open-source-friendly.
1. ESP32 and Bitcoin Payment Terminals
The ESP32 microcontroller, developed by Espressif Systems, is a powerful yet budget-friendly device. Its affordability, coupled with features such as dual-core processing, integrated Wi-Fi/Bluetooth, and low power consumption, makes it a game-changer for building Bitcoin payment terminals.
Why Low-Cost Solutions Matter
Small businesses in emerging markets often struggle with expensive payment infrastructure. Low-cost solutions like ESP32-based payment terminals empower these businesses to embrace Bitcoin as a payment option without breaking the bank. With Bitcoin’s decentralized nature, businesses can bypass costly intermediaries and transaction fees, making their operations more efficient.
Notable Features of the ESP32
- Dual-core Processor: Handles multiple tasks seamlessly, from running Bitcoin transaction software to displaying user interfaces.
- Wi-Fi and Bluetooth Connectivity: Enables easy internet access or pairing with other devices for real-time Bitcoin payments.
- Low Power Consumption: Suitable for battery or solar-powered setups in remote areas.
Example Use Case: Entrepreneurs can deploy ESP32 terminals in places like farmers’ markets, where lightweight, portable, and inexpensive payment systems are essential.
Useful Link:
2. Advantages of Using ESP32 for Bitcoin Payments
Open-Source Development and Community Support
The ESP32 boasts robust open-source development resources, making it accessible for beginners and experienced developers alike. The vibrant community provides libraries, documentation, and tutorials for quick implementation.
Small Form Factor
With its compact size, the ESP32 is perfect for portable or embedded systems. Entrepreneurs can design sleek, minimalistic Bitcoin payment terminals that are easy to carry and deploy.
Integration with Bitcoin Lightning Wallets
ESP32 supports easy integration with popular Bitcoin Lightning wallets like LNBits and LNDHub. These wallets enable fast, low-cost transactions, perfect for micro-payments.
Direct API Interaction
The ESP32 can interact directly with APIs like BTCPay Server and LNURL to process Bitcoin payments securely.
Useful Links:
3. Step-by-Step: Setting Up an ESP32-Based Bitcoin Payment Terminal
Here’s a quick guide to creating your own Bitcoin payment terminal using an ESP32 board:
-
Install Firmware
Use firmware like ESPHome or Micropython to get started with your ESP32. -
Integrate with Payment APIs
Link your ESP32 to BTCPay Server or LNURL for Bitcoin transaction processing. These APIs provide tools for invoicing, QR code generation, and payment verification. -
Program the ESP32
Use libraries like ESP32 Arduino Core to write custom code for your payment terminal. -
Add Hardware Components
Equip the ESP32 with a small OLED display to show transaction details and a QR code scanner for easy payment input.
Useful Links:
4. Real-World Use Cases and Deployment
Deployment Scenarios
- Farmers’ Markets and Street Vendors: Accept Bitcoin payments with portable, low-cost ESP32 terminals.
- Off-Grid Locations: Power terminals with batteries or solar panels to process transactions in areas with limited infrastructure.
Off-Grid Communication
Combine the ESP32 with Meshtastic or LoRa modules to enable communication in remote areas, where internet access is unavailable.
Useful Links:
5. Challenges and Future Prospects
Challenges
- Security: Ensuring secure transaction signing and protecting against hardware vulnerabilities.
- Durability: Building rugged payment terminals that withstand various environments.
- User Trust: Convincing users of the reliability of Bitcoin payment systems.
Future Prospects
Technologies like Blockstream’s Satellite and LNURL-offline present exciting opportunities for offline Bitcoin transactions. As Bitcoin adoption grows, ESP32-based terminals could play a pivotal role in enabling micro-payments and decentralized payment systems worldwide.
Useful Links:
Closing Thoughts
The ESP32’s affordability, versatility, and open-source nature make it an ideal choice for building low-cost Bitcoin payment terminals. By enabling small businesses and remote communities to accept Bitcoin, these solutions pave the way for broader adoption of Bitcoin. Developers and entrepreneurs are encouraged to experiment, innovate, and share their designs, contributing to a future where decentralized payments are accessible to all.
Let’s embrace the possibilities and build a more inclusive financial system, one transaction at a time.
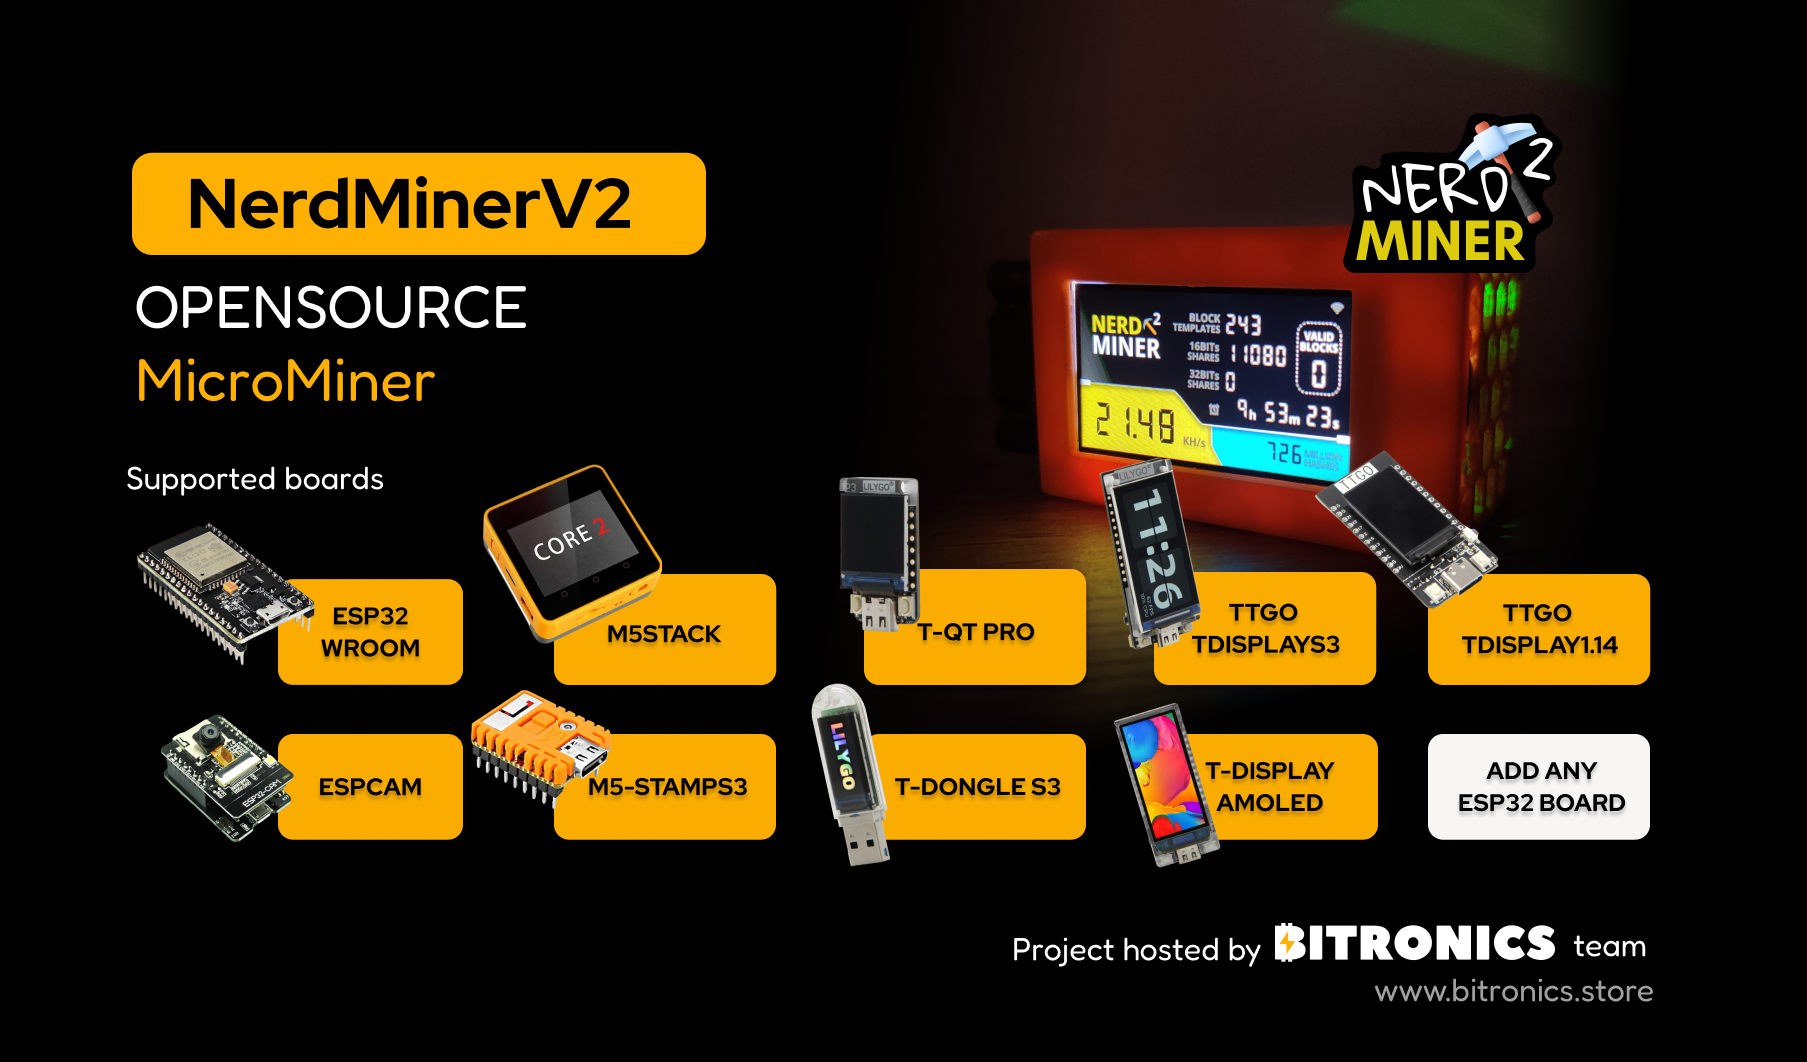
NerdSoloMiner v2: Building Your Solo Bitcoin Miner
Welcome to the world of NerdSoloMiner v2, an open-source project designed to teach you the art of Bitcoin mining while adding a cool piece of hardware to your desk! This guide will walk you through the setup, explain its features, and show you how to mine Bitcoin solo using affordable and accessible components like the TTGO T-Display S3.
What Is NerdSoloMiner v2?
The NerdSoloMiner v2 project uses an ESP32 microcontroller to mine Bitcoin via the Stratum protocol on solo mining pools. The primary goal is not profitability but to learn and experience Bitcoin mining hands-on. Despite its low mining power, it’s an excellent starting point for hobbyists and tech enthusiasts.
Original project repository: HAN GitHub Repository
Why Build a NerdSoloMiner?
- Learn Bitcoin Mining Basics: Understand how the Stratum protocol works and how mining pools distribute rewards.
- Affordable Hardware: With a small investment in ESP32 boards and basic components, you can start mining solo.
- Customizable Setup: This miner supports multiple ESP32 boards and allows for tweaking settings via Wi-Fi or SD cards.
- Aesthetic and Functional: The project includes stylish clock displays and mining stats screens, making it a unique desktop accessory.
Features of NerdSoloMiner v2
- Multicore Processing: Utilizes both cores of the ESP32 for efficient mining.
- Stratum Protocol: Connects to pools like public-pool.io.
- Wi-Fi Manager: Configure miner settings wirelessly.
- Customizable Screens:
- NerdMiner Screen: Displays real-time mining stats.
- ClockMiner Screen: Stylish clock with mining themes.
- GlobalStats Screen: Showcases global mining data.
- Pool Flexibility: Works with multiple pools, although performance may vary due to low share difficulty.
- Open-Source Firmware: Easily updatable to add new features.
Hardware Requirements
Here’s what you’ll need to get started:
Recommended Boards
- LILYGO T-Display S3 (or AMOLED version)
- ESP32-WROOM-32
- LILYGO T-QT Pro
- ESP32-CAM
- Wemos Lolin S3 Mini
- M5-StampS3
For a full list of supported boards, check the Build Tutorial.
Accessories
- 3D-Printed Enclosure: Download the 3D box design.
- Micro USB or USB-C Cable: For power and data transfer.
- OLED Display: Optional for better visuals.
- SD Card (optional): For offline configuration.
How to Build Your NerdSoloMiner
Step 1: Flash the Firmware
Option 1: Use the microMiners Flashtool
- Visit NM2 Flasher Online Tool, Google Chrome Recommended using Google Chrome (preferably in incognito mode).
- Select your ESP32 board and flash the firmware.
Option 2: Manually Flash the Firmware
- Download the repository from GitHub.
- Use ESPtool Online to upload the
.binfirmware files. - Follow board-specific instructions to enter boot mode if necessary (e.g., holding the boot button).
Step 2: Configure Your Miner
- After flashing, connect to the Wi-Fi Access Point:
- SSID: NerdMinerAP
- Password: MineYourCoins
- Enter your Wi-Fi credentials and Bitcoin wallet address.
- (Optional) Use an SD card to configure settings via a
config.jsonfile.
Example config.json file:
{
  "SSID": "myWifiSSID",
  "WifiPW": "myWifiPassword",
  "PoolUrl": "public-pool.io",
  "PoolPort": 21496,
  "PoolPassword": "x",
  "BtcWallet": "yourBTCwalletID",
  "Timezone": 2,
  "SaveStats": false
}
Step 3: Start Mining
- Connect to a low-difficulty pool like public-pool.io.
- Monitor mining stats on the built-in screens or remotely via UART logs.
Supported Pools
Compatible Pools
- public-pool.io: Web | Port: 21496
- pool.nerdminers.org: Web | Port: 3333
- pool.pyblock.xyz: Web | Port: 3333
Non-Compatible Pools
Troubleshooting
- Firmware Issues: Enter boot mode by holding the boot button during power-up.
- Wi-Fi Problems: Use the “Erase All Flash” option in ESPtool to reset configurations.
- Low Share Difficulty: Stick to pools designed for open-source miners.
Real-World Applications
The NerdSoloMiner isn’t just a novelty; it has potential real-world applications:
- Educational Tool: Ideal for teaching Bitcoin mining principles.
- Stylish Desktop Accessory: Dual-purpose as a clock and mining stats display.
- Low-Power Miner: Perfect for experimenting with sustainable setups using solar or battery packs.
Final Thoughts
The NerdSoloMiner v2 combines learning, creativity, and Bitcoin mining into one exciting project. It’s a testament to how open-source hardware can democratize technology. Whether you’re a Bitcoin enthusiast or a DIY hobbyist, this project offers endless possibilities.
Ready to start mining?